Partitioning your hard disk can be a tedious process but I strongly recommend it. Once done, your disk remains partitioned (unless you mess with it) and it’s the best means I’ve found of keeping your data safe.
Partitioning – What it Means
Partitioning refers to the sub-division of your hard disk into several “virtual disks”, each of which has its own unique identifying “Drive Letter.” Thus, your computer behaves as if you have several separate hard disks rather than just one.
The advantage of this is that if your Windows Operating System crashes due to a virus or physical corruption, your data remains safe and all you need to do is re-format the C partition, reinstall Windows and your other programs and start working again. Your data remains safe. If you’re in a hurry, you may even “boot” your computer from a CD or Floppy Drive and copy your data to a CD / floppy to work on it on another computer.
How to Partition Your Hard Disk
Step 1 and only: Pick up the phone
That’s right, pick up the phone and call the nearest geek.
Partitioning is an expert operation and involves backing up your data to an external drive, formatting your disk and then creating a partition table. It’s such an expert operation, I’m not even going to tell you how to do it. I don’t want to be responsible, however remotely, for the loss of your data.
So call that geek and let him partition the disk. Make sure he backs up your data to an external drive first.
Once Partitioned
Once your hard disk has been partitioned, get your geek friend / professional to save your data into folders on drives other than C.
Let’s say the geek creates two partitions, C and D. Create folders on the D drive to hold your existing data and tell the geek to copy your data into those folders. For example, you may create a new “My Documents” folder with “My Music”, “My Pictures”, etc. as sub-folders, all on your D drive. Then simply copy the data from the external disk into those folders.
That’s it. You’re up and running.
Saving New Files
Here’s where you begin to intelligently use the partition you’ve created… er… the geek has created.
Let’s say you create a new Word document. When you try to save it for the first time, Windows automatically takes you to its default document folder, which is C:/Windows/My Documents.
Do you see something wrong with the above folder?
That’s right, it’s on the C Drive. Exactly where you DON’T want to save it.
So what do you do?
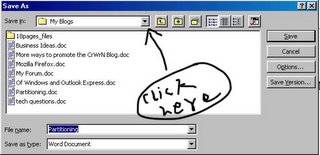
Simple. Just click the little arrowhead next to “Save In” (see pic below)

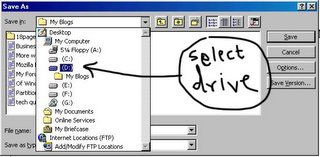
Then select the drive and folder where you want to save it (see pic below)

Then, if the filename is the one you want to give your file, OK your way out or change the filename and OK your way out.
Once you’ve saved the file there, Windows will automatically over-write it with new versions of the file every time you save it again.
There is, of course, a learning curve associated with saving your file in any but the default folder. You may automatically save a file or two in the default folder, especially if you’re in a hurry. No harm done. As soon as you realise your folly, move the file into the folder in the other partition, using the “My Computer” icon or the ”Windows Explorer” icon.
And Finally
If you need further clarification on the above procedures, just ask. Post a comment here and bung in your question. I’ll answer. Always.
Deepak

No comments:
Post a Comment
Hi,
Please keep your comment focused on technology. Comments of a political nature will be deleted.
Thanks,
Deepak